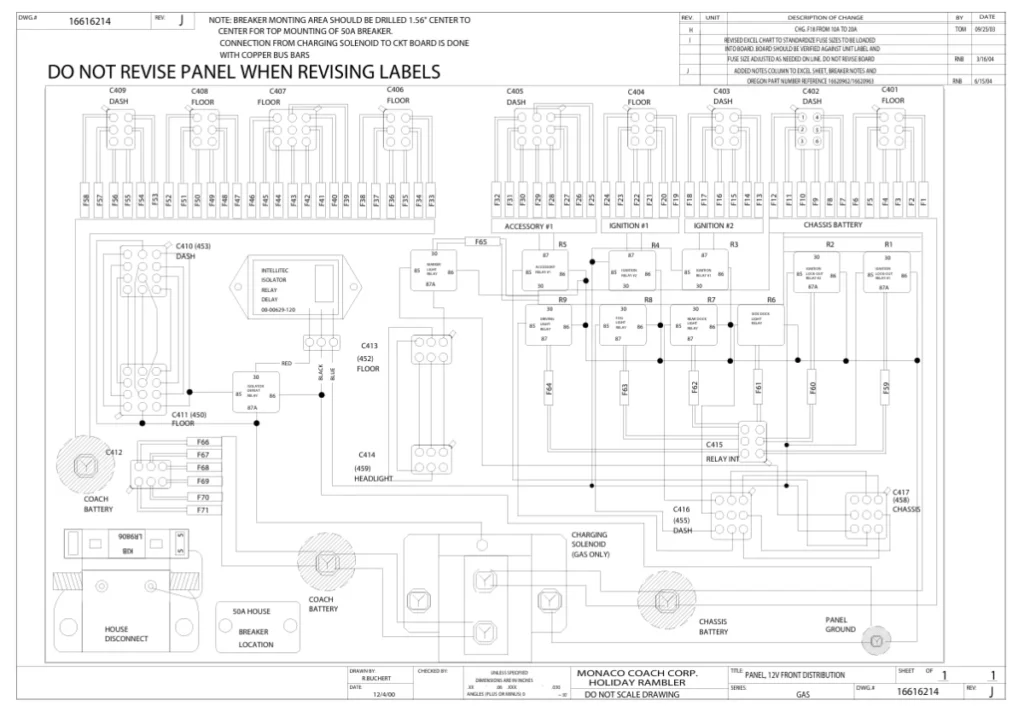
A Monaco RV electrical wiring diagram helps you understand how power moves through your motorhome. It shows the connection between shore power, generator power, batteries, inverter, converter, breaker panel, fuse panel, outlets, lights, appliances, and grounding points.
This diagram is useful when you need to troubleshoot power loss, blown fuses, tripped breakers, battery charging problems, dead outlets, or appliance issues.
Monaco Coach provides free digital owner’s manuals by model year and model through its official owner manual archive, which is the best place to start when looking for the correct diagram for your RV.
- Why the Monaco RV Electrical Wiring Diagram Matters
- Where to Find a Monaco RV Electrical Wiring Diagram
- Main Parts Shown in a Monaco RV Wiring Diagram
- Safety Steps Before Working on Monaco RV Wiring
- Tools Needed for RV Electrical Troubleshooting
- How to Read a Monaco RV Electrical Wiring Diagram
- Common Monaco RV Electrical Problems
- Step-by-Step Troubleshooting Guide
- DIY Repair Tips for Monaco RV Wiring
- When to Call an RV Electrician
- Maintenance Tips to Prevent Wiring Problems
- FAQs About Monaco RV Electrical Wiring Diagrams
- Conclusion
Why the Monaco RV Electrical Wiring Diagram Matters
Your Monaco RV uses more than one electrical system. Most RVs include:
- 120-volt AC power for outlets, air conditioners, microwave ovens, and large appliances
- 12-volt DC power for lights, water pump, fans, slides, controls, and battery-powered devices
- Shore power from a campground pedestal
- Generator power
- House batteries
- Chassis battery
- Fuse panel
- Breaker panel
- Inverter or inverter/charger
- Converter or charging system
RV electrical systems commonly use both 12V DC and 120V AC circuits, and each system powers different parts of the RV. (RVshare)
A wiring diagram helps you follow each circuit instead of guessing. This saves time and reduces the chance of replacing the wrong part.
Where to Find a Monaco RV Electrical Wiring Diagram
The best place to find a Monaco RV wiring diagram is your owner’s manual. Monaco’s official website has a free owner manual archive where you may search by year and model.
You may also check:
- Printed manual binder inside the RV
- Monaco Coach owner manual archive
- REV Group service and repair support
- Monaco owner forums
- Previous owner documents
- RV repair shops familiar with Monaco motorhomes
Always match the wiring diagram with your exact model year, model, trim, and floor plan. A Monaco Dynasty diagram may not match a Monaco Diplomat, Camelot, Signature, Knight, Windsor, or La Palma.
Main Parts Shown in a Monaco RV Wiring Diagram
A Monaco RV electrical wiring diagram usually includes several key sections.
1. Shore Power System
Shore power connects your RV to an external power source at a campground, home outlet, or RV pedestal. It usually feeds the main breaker panel and charges the battery system through the converter or inverter/charger.
2. Generator System
The generator supplies 120V AC power when shore power is not available. In many RVs, generator power passes through a transfer switch before reaching the breaker panel.
3. Automatic Transfer Switch
The transfer switch selects between shore power and generator power. If this part fails, your RV may lose AC power even when the generator or shore power source works.
4. Breaker Panel
The breaker panel protects 120V AC circuits. It controls major loads such as:
- Air conditioner
- Microwave
- Outlets
- Washer or dryer
- Water heater electric mode
- Refrigerator AC mode
5. Fuse Panel
The fuse panel protects 12V DC circuits. It often controls:
- Interior lights
- Water pump
- Vent fans
- Furnace control board
- Refrigerator control board
- Slide controls
- Awning
- LP detector
- Tank monitor panel
6. House Battery Bank
The house batteries power 12V loads when the RV is not connected to shore power. They may also feed the inverter if your Monaco RV has one.
7. Inverter or Inverter/Charger
An inverter changes 12V DC battery power into 120V AC power. Some Monaco RVs use an inverter/charger, which also charges the batteries when shore power or generator power is available.
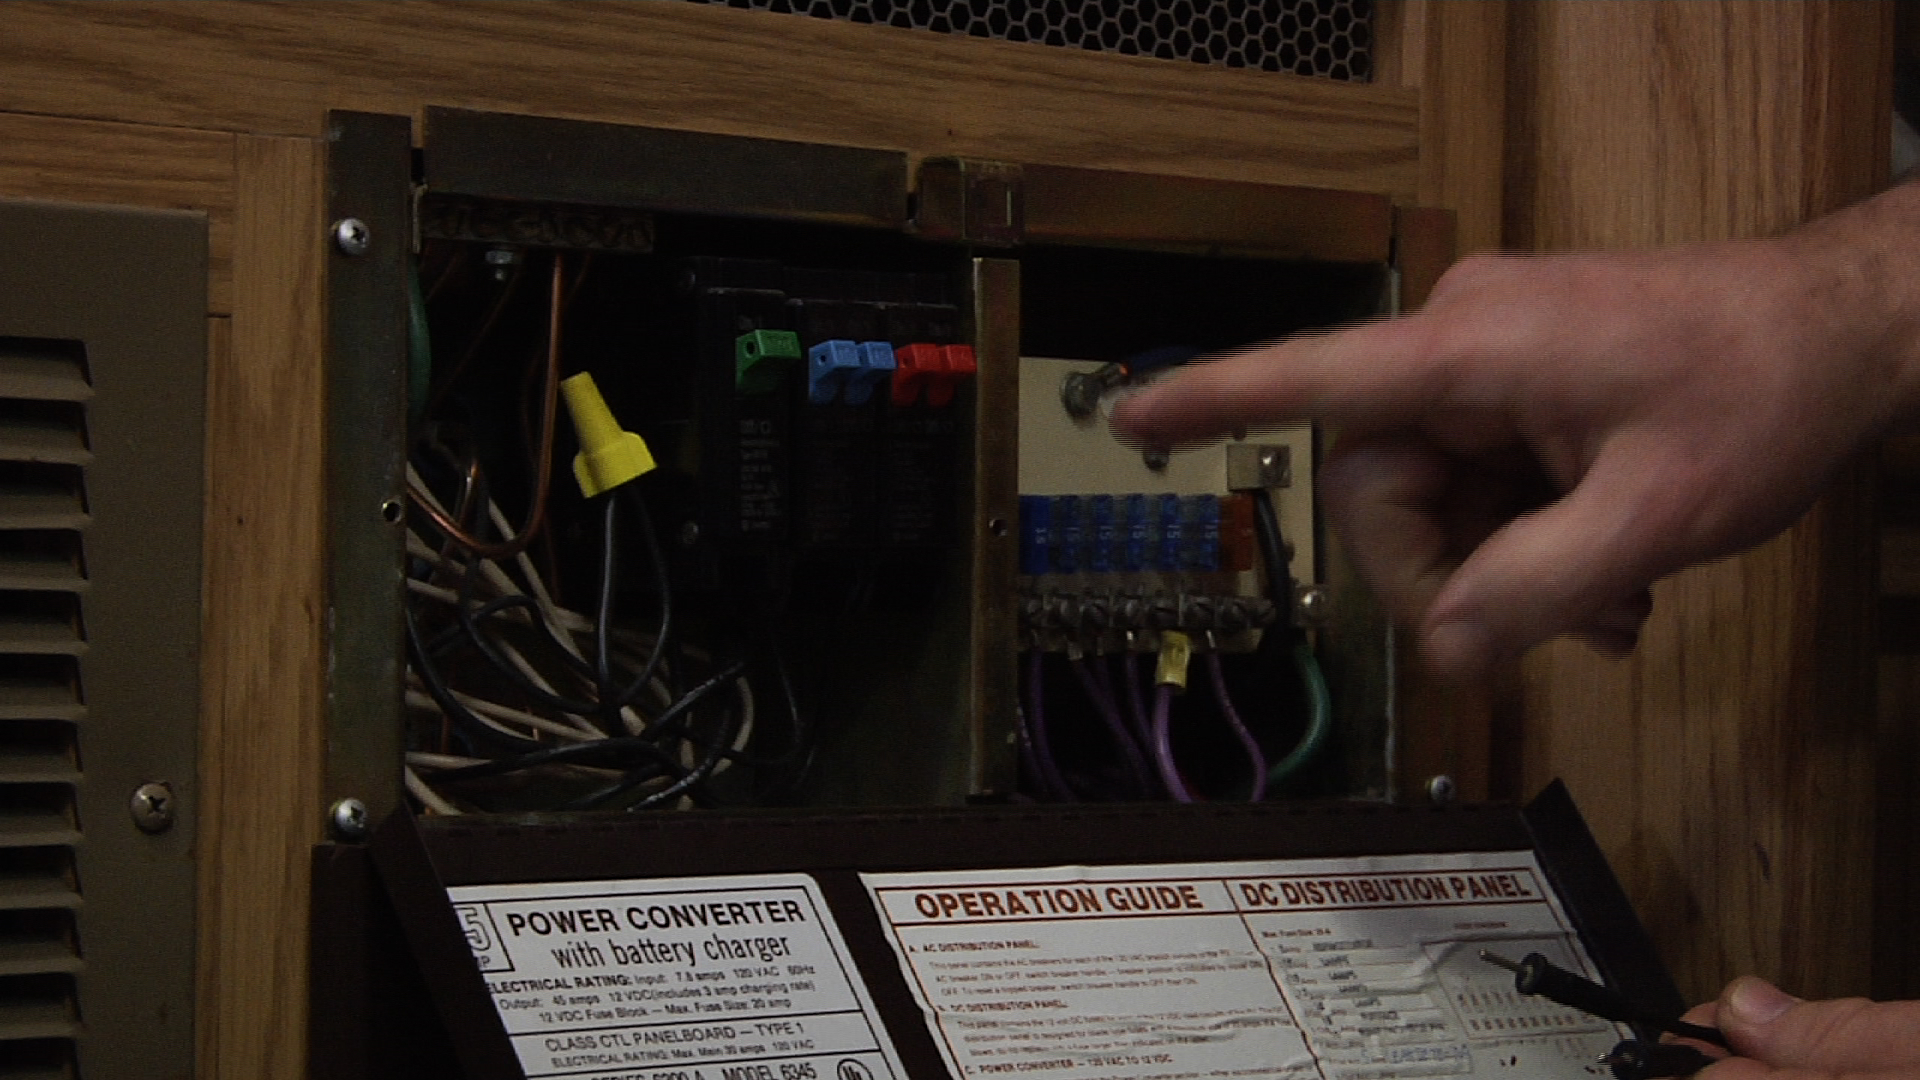
8. Converter
A converter changes 120V AC power into 12V DC power. It also helps run DC loads and charge batteries in some RV systems.
9. Grounding System
Grounding protects the RV electrical system from faults. Bad grounds may cause flickering lights, weak appliances, strange voltage readings, or random electrical failures.
Safety Steps Before Working on Monaco RV Wiring
Before checking wiring, take safety seriously. RV electrical systems include both low-voltage and high-voltage circuits.
Follow these steps first:
- Turn off shore power.
- Shut down the generator.
- Turn off the inverter.
- Disconnect the house battery negative cable when working on DC circuits.
- Confirm power is off with a multimeter.
- Use insulated tools.
- Keep water away from electrical panels.
- Do not touch bare wires.
- Label wires before removing them.
- Call a qualified RV technician for 120V AC repair if you are unsure.
A wiring diagram helps with troubleshooting, but it does not replace electrical training.
For safer inspection, use insulated electrical gloves and a non-contact voltage tester. These tools help you check whether a wire or outlet is live before touching anything.
Tools Needed for RV Electrical Troubleshooting
Keep these tools ready before inspecting your Monaco RV electrical system:
- Digital multimeter
- Wire stripper
- Wire cutter
- Screwdriver set
- Electrical tape
- Heat shrink tubing
- Fuse puller
- Replacement fuses
- Flashlight
- Cable ties
- Insulated gloves
- Contact cleaner
- Label maker or masking tape
A multimeter is the most important tool. It helps test voltage, continuity, polarity, and battery condition.
Before you start troubleshooting, keep a few basic RV electrical tools ready. A digital multimeter helps you check battery voltage, outlet power, continuity, and faulty wiring. You may also need a wire stripper and cutter, electrical tape, and heat shrink tubing for small wiring repairs.
How to Read a Monaco RV Electrical Wiring Diagram
A wiring diagram may look confusing at first. Break it into small sections.
Start With the Power Source
Find where power begins. This may be:
- Shore power inlet
- Generator
- Battery bank
- Solar controller
- Alternator charging line
Then follow the wires toward the transfer switch, breaker panel, fuse panel, inverter, converter, or appliance.
Check Wire Colors
Wire colors help identify circuits, but color standards may vary by RV model and previous repairs. Never rely on color alone. Use the diagram and test with a multimeter.
Common meanings may include:
| Wire Color | Common Use |
|---|---|
| Black | Hot wire or positive DC wire |
| Red | Positive DC wire or second hot line |
| White | Neutral in AC systems or negative in some DC systems |
| Green or bare copper | Ground |
| Blue or yellow | Accessory, lighting, brake, or control circuits |
Always confirm with your exact Monaco RV wiring diagram.
Read Symbols and Labels
Most wiring diagrams use symbols for:
- Battery
- Fuse
- Breaker
- Switch
- Ground
- Relay
- Outlet
- Motor
- Light
- Appliance
- Connector
The diagram legend explains these symbols. Read the legend before tracing circuits.
Follow One Circuit at a Time
Do not study the whole diagram at once. Pick one problem and follow that circuit.
Example:
If your water pump does not work, trace this path:
Battery → fuse panel → water pump switch → water pump → ground
This method makes troubleshooting faster and cleaner.
Common Monaco RV Electrical Problems
Electrical issues in a Monaco RV often come from loose connections, weak batteries, failed fuses, bad grounds, damaged wires, or aging components.
Dead Outlets
Possible causes:
- Tripped breaker
- Tripped GFCI outlet
- No shore power
- Generator issue
- Transfer switch fault
- Inverter problem
Start by checking the breaker panel and GFCI outlets.
Interior Lights Not Working
Possible causes:
- Blown 12V fuse
- Weak house batteries
- Bad light switch
- Loose ground
- Damaged wire
Check battery voltage first, then inspect the fuse panel.
Battery Not Charging
Possible causes:
- Failed converter
- Inverter/charger issue
- Loose battery cable
- Corroded terminal
- Bad battery
- Blown charging fuse
- Shore power issue
Test battery voltage while plugged into shore power. If the voltage does not rise, the charging system needs inspection.
Breaker Keeps Tripping
Possible causes:
- Overloaded circuit
- Short circuit
- Faulty appliance
- Damaged wire
- Weak breaker
Unplug appliances on that circuit, reset the breaker, then reconnect one item at a time.
Fuse Keeps Blowing
Possible causes:
- Shorted wire
- Wrong fuse size
- Faulty motor
- Damaged light fixture
- Water damage
- Pinched wiring
Never replace a fuse with a higher amp rating. Fix the cause instead.
If your RV has repeated fuse issues, keep a 12V automotive fuse assortment kit in your toolbox. For loose or damaged wiring connections, a set of electrical wire connectors may help with basic repairs.
Step-by-Step Troubleshooting Guide
Use this process when diagnosing Monaco RV electrical problems.
Step 1: Identify the Problem
Write down the exact issue.
Examples:
- No power to the outlets
- Lights flicker
- The generator runs, but no AC power
- The battery drains overnight
- The refrigerator control panel is dead
- Slide-out does not move
A clear problem statement saves time.
Step 2: Find the Correct Diagram
Use the Monaco RV electrical wiring diagram for your exact model and year. Do not use a random online diagram unless it matches your RV.
Step 3: Check the Simple Things First
Before opening panels, check:
- Shore power cord
- Generator breaker
- Main breaker
- GFCI outlet
- Battery disconnect switch
- House battery voltage
- Blown fuses
- Loose terminals
Many RV electrical problems start with simple faults.
Step 4: Test Voltage
Use a multimeter to test voltage at each point in the circuit. Start at the power source and move toward the load.
Example for a dead light:
Battery voltage → fuse panel → switch → light fixture → ground
The point where the voltage disappears usually reveals the fault area.
Step 5: Inspect Grounds
Bad grounds cause strange symptoms. Clean and tighten ground connections. Look for rust, loose screws, broken wires, or corroded terminals.
Step 6: Repair or Replace the Faulty Part
Common repairs include:
- Replacing a fuse
- Tightening a loose terminal
- Cleaning corrosion
- Replacing damaged wire
- Replacing a bad outlet
- Replacing a faulty switch
- Replacing a weak battery
Use the same wire gauge, fuse rating, and connector type unless a qualified technician recommends a proper upgrade.
DIY Repair Tips for Monaco RV Wiring
Small 12V DC repairs may be manageable if you have basic electrical knowledge.
Good DIY practices:
- Take photos before removing wires
- Label every wire
- Replace damaged connectors
- Use heat-shrink tubing
- Secure loose wires with cable ties
- Keep wires away from sharp metal edges
- Use proper crimping tools
- Match fuse size to the circuit
- Test the circuit before closing panels
Avoid DIY work on 120V AC circuits if you lack training. Mistakes with AC wiring may damage appliances or create fire and shock risks.
When to Call an RV Electrician
Call a qualified RV technician if you notice:
- Burning smell
- Melted wires
- Hot breaker panel
- Repeated breaker trips
- Repeated fuse failures
- No power from either the shore or the generator
- Inverter fault codes
- Transfer switch noise or failure
- Water damage near wiring
- Unknown previous repairs
Monaco Coach lists REV service and repair centers with factory-trained support for Monaco RV maintenance and repair. (Monaco Coach)
Maintenance Tips to Prevent Wiring Problems
Regular maintenance helps prevent electrical failures.
Check these items every few months:
- Battery terminals
- Ground connections
- Shore power cord
- Plug blades
- Breaker panel
- Fuse panel
- GFCI outlets
- Inverter vents
- Converter fan
- Generator output
- Exterior electrical compartments
Also check for rodent damage, water leaks, loose connectors, and burnt smells.
Regular maintenance is easier with the right supplies. You may keep battery terminal cleaner, dielectric grease, and cable ties in your RV tool kit to prevent corrosion and organize loose wires.
FAQs About Monaco RV Electrical Wiring Diagrams
Where do I find the Monaco RV electrical wiring diagram?
Start with the Monaco Coach owner manual archive. Choose the correct year and model. You may also check the printed owner binder, previous owner documents, Monaco owner forums, or REV service support.
Are all Monaco RV wiring diagrams the same?
No. Wiring changes by year, model, floor plan, engine type, chassis, options, and installed equipment. Always use the diagram for your exact RV.
What is the difference between 12V and 120V in a Monaco RV?
The 12V DC system powers lights, fans, controls, pumps, and battery-based devices. The 120V AC system powers outlets, air conditioners, microwave ovens, and other large appliances. (RVshare)
Why do my RV outlets work only on shore power?
Your outlets may not be connected to the inverter circuit. Some RV outlets work only when shore power or generator power is available.
Why do my lights work, but the outlets do not?
Your lights usually run on 12V DC power, while outlets use 120V AC power. This means the battery system may work while the AC system has a shore power, breaker, inverter, or transfer switch issue.
Is it safe to repair Monaco RV wiring myself?
Basic 12V checks may be safe with the right tools and knowledge. For 120V AC repairs, inverter wiring, transfer switch issues, or burnt wiring, hire a qualified RV technician.
Conclusion
A Monaco RV electrical wiring diagram is one of the most useful tools for troubleshooting your motorhome. It helps you understand how shore power, generator power, batteries, fuses, breakers, inverters, converters, and appliances connect.
Start with the correct diagram for your model year. Follow one circuit at a time. Test with a multimeter. Check fuses, breakers, grounds, and battery voltage before replacing expensive parts.
For serious electrical faults, use a trained RV technician. Your wiring diagram gives direction, but safe repair needs the right tools, testing, and experience.