Replacing the air admittance valve for an RV involves removing the old valve and installing a new one in its place. This valve helps regulate the flow of air into the RV’s plumbing system and prevents backflow of sewer gases.
By following a few simple steps, you can easily replace the air admittance valve and ensure the proper functioning of your RV’s plumbing system. We will guide you through the process of replacing the air admittance valve, providing you with all the information you need to get the job done effectively and efficiently.
So let’s dive in and learn how to replace the air admittance valve for your RV.
:strip_icc()/How-to-install-air-admittance-valve_color-d37370f034c54b19bae09572f532f40d.jpg)
Credit: www.bhg.com
- Signs Of A Faulty Air Admittance Valve
- Tools And Materials Needed
- Steps To Replace The Air Admittance Valve
- Testing The New Valve
- Maintenance Tips For Air Admittance Valve
- Benefits Of Upgrading The Air Admittance Valve
- Frequently Asked Questions On Replacing The Air Admittance Valve For Rv
- Conclusion
Signs Of A Faulty Air Admittance Valve
RV owners experiencing issues with their air admittance valve may notice signs such as foul odors, gurgling sounds, or problems with the drainage system. Replacing the faulty valve is crucial to ensure proper ventilation and prevent further plumbing problems.
Unpleasant Odors
One of the most noticeable signs of a faulty air admittance valve in an RV is the presence of unpleasant odors. When the valve is working correctly, it prevents sewer gases from entering the living space of the RV. However, if the valve becomes damaged or fails to seal properly, these noxious odors can infiltrate your RV, causing discomfort and potential health issues. It’s important to address this issue promptly to maintain a clean and fresh-smelling living environment.
Gurgling Sounds In The Plumbing System
An additional sign that your air admittance valve in your RV needs replacing is the occurrence of gurgling sounds in the plumbing system. When the valve is functioning properly, it allows air to enter the plumbing system and equalize the pressure, preventing any gurgling or unusual noises. However, if the valve is faulty or blocked, it can disrupt the balance of air and water flow, causing gurgling sounds. These noises can be annoying and indicate an underlying issue with the air admittance valve that needs attention.
Tools And Materials Needed
Replacing the air admittance valve for your RV is a relatively simple task that can be done with just a few tools and materials. By having everything you need on hand before you start the project, you can save time and ensure a successful replacement. This section outlines the essential tools and required replacement parts you’ll need to get the job done.
Essential Tools
Before you begin replacing the air admittance valve in your RV, make sure you have the following essential tools:
- A screwdriver
- An adjustable wrench
- Pipe cutters or a hacksaw
- A pipe wrench
- A utility knife
These tools will help you remove the old valve and install the new one properly. Having them readily available will make the replacement process much smoother and more efficient.
Required Replacement Parts
In addition to the tools, you’ll also need a few replacement parts to complete this project. Here’s a list of the required replacement parts:
- The new air admittance valve
- PVC glue or sealant
- PVC pipe fittings
- Thread seal tape
The new air admittance valve is the most critical component. Ensure that you purchase one that is compatible with your RV’s plumbing system. The PVC glue or sealant will help create a watertight seal, and the PVC pipe fittings will connect the valve to the existing plumbing. Lastly, the thread seal tape will be used to prevent any leaks.
By having these replacement parts ready, you can avoid any unnecessary trips to the hardware store and complete the replacement efficiently.
Steps To Replace The Air Admittance Valve
When it comes to maintaining your RV plumbing system, replacing the air admittance valve is a crucial task. This valve helps to regulate air pressure and prevent sewer gas from backing up into your RV. If you are experiencing unpleasant odors or issues with your plumbing system, it may be time to replace the air admittance valve. Here are the step-by-step instructions for replacing the air admittance valve in your RV.
Turn Off Water Supply
To begin the replacement process, start by turning off the water supply to your RV. Locate the main water shut-off valve and turn it to the off position to prevent any water flow during the replacement process.
Remove The Old Valve
Next, locate the existing air admittance valve in your RV plumbing system. Use a wrench or pliers to carefully remove the old valve. Make sure to disconnect any pipes or fittings attached to the valve and clean the surrounding area before proceeding to install the new valve.
Install The New Valve
After removing the old valve, it’s time to install the new air admittance valve. Ensure that the new valve is the correct size and type for your RV plumbing system. Carefully attach the new valve to the designated location, ensuring a secure and watertight connection. Reconnect any pipes or fittings, and then turn the water supply back on to test the newly installed valve.
Testing The New Valve
Replace the air admittance valve for your RV with the new valve and ensure an efficient and reliable system. Improve your RV’s ventilation and prevent odors with this easy installation.
Testing the new air admittance valve for your RV is essential to ensure its proper functioning. Running water through the system and checking for leaks are crucial steps in this process. Prioritize ensuring proper ventilation to maintain optimal air flow within the system.Running Water
– Turn on the water supply and let it run through the system to test the functionality of the new valve. – Observe the water flow and listen for any unusual sounds coming from the valve or surrounding areas.Checking For Leaks
– Inspect all connections and joints for any signs of leakage. – Use a dry cloth to wipe the areas clean and monitor for any moisture accumulation.Ensuring Proper Ventilation
– Proper ventilation is crucial to prevent air pressure build-up and maintain the efficiency of the air admittance valve. – Check for any obstructions in the ventilation system and ensure there is adequate airflow. By following these steps, you can effectively test the new air admittance valve installed in your RV.Maintenance Tips For Air Admittance Valve
When maintaining your RV, it’s crucial to ensure the air admittance valve is in top condition. Replacing it regularly will help prevent odors and maintain proper plumbing function for your RV. It’s a simple and effective way to keep your RV’s plumbing system in excellent working order.
Maintenance Tips for Air Admittance Valve Performing regular inspections, cleaning, and lubrication of the air admittance valve in your RV is crucial to ensure proper functionality and avoid potential issues. Here are some essential maintenance tips to keep your air admittance valve in top condition: “`htmlRegular Inspections
“` Regularly check the air admittance valve for any signs of damage or wear, such as cracks or leaks. Inspect the valve during routine RV maintenance to catch potential issues early. “`htmlCleaning And Lubrication
“` Clean the air admittance valve using a mild detergent solution and a soft brush to remove dirt and debris. Lubricate the valve with silicone lubricant to maintain smooth operation. Regularly inspect and maintain your air admittance valve to prevent potential issues and ensure it functions properly.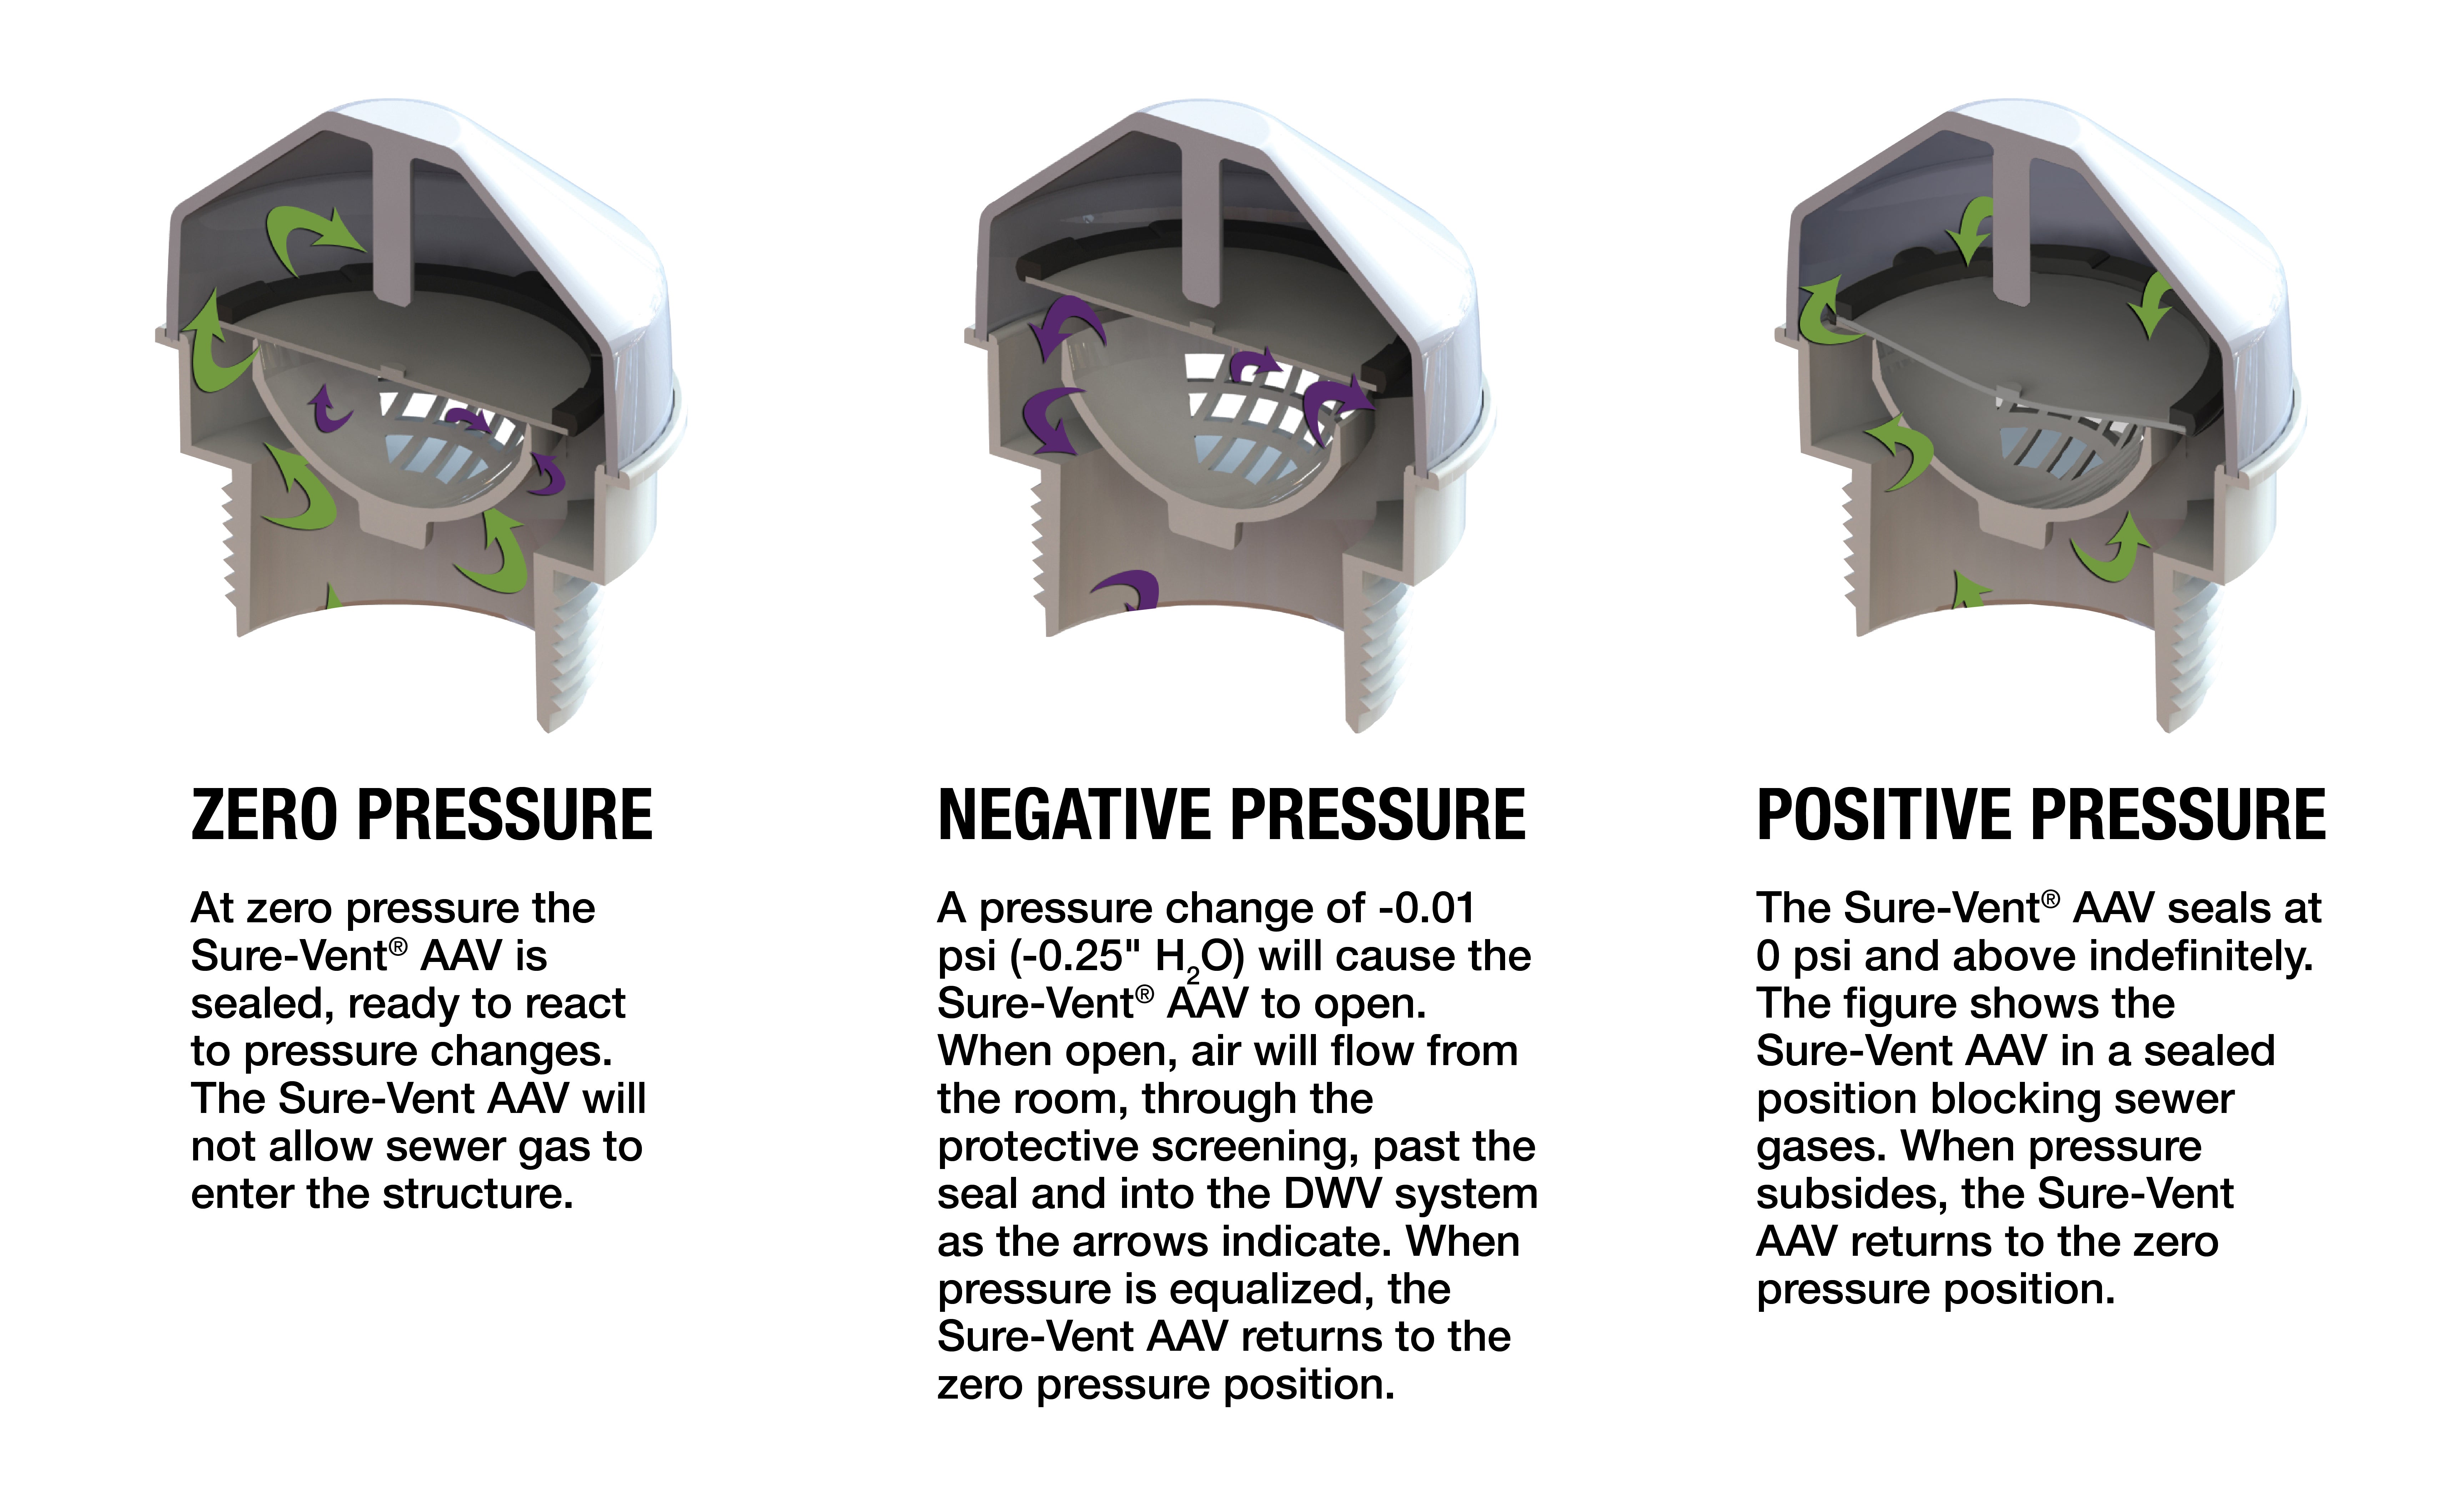
Credit: www.oatey.com
Benefits Of Upgrading The Air Admittance Valve
Replacing the air admittance valve in your RV can have numerous benefits that improve the overall functionality of your plumbing system and contribute to a more pleasant camping experience.
Improved Odor Control
Upgrading the air admittance valve enhances the prevention of odors from permeating your RV living space, ensuring a more enjoyable and comfortable environment.
Enhanced Plumbing System Performance
By replacing the air admittance valve, you can optimize the performance of your RV’s plumbing system, reducing the risk of blockages and leaks, and promoting better water flow.

Credit: www.amazon.com
Frequently Asked Questions On Replacing The Air Admittance Valve For Rv
What Is An Air Admittance Valve (aav) And Its Function?
An Air Admittance Valve (AAV) is a one-way valve that allows air to enter the plumbing system to prevent negative pressure, aiding in drainage and preventing sewer gas intrusion.
When Should You Consider Replacing The Air Admittance Valve?
Consider replacing the AAV if you notice foul odors, slow drainage, or gurgling sounds in your RV’s plumbing system. Regular maintenance is crucial to ensure proper functioning.
How Can You Replace The Air Admittance Valve In Your Rv?
To replace the AAV in your RV, turn off water supply, unscrew the old valve, apply pipe thread sealant to the new valve, and install it tightly using a wrench. Test for leaks and odors post-installation.
Conclusion
Replacing the air admittance valve for your RV is a simple yet essential maintenance task. By understanding the importance of this component and knowing when to replace it, you can ensure the proper functioning of your RV’s plumbing system. Regular maintenance can prevent future issues and keep your RV in top condition for your next adventure.