If your Dometic 310 toilet is leaking between the bowl and the base, check the seal and tighten the bolts connecting the two parts. A common issue with this model is a loose connection causing leaks.
When dealing with a leaking toilet, it’s essential to address the problem promptly to prevent further damage and potential water wastage. In this guide, we will explore the steps to identify, troubleshoot, and fix a leak in your Dometic 310 toilet to ensure optimal performance and water efficiency.
By following these simple steps, you can resolve the issue and enjoy a leak-free toilet in no time.
Common Causes Of Leakage
The Dometic 310 toilet may experience leakage between the bowl and base due to worn out seals, loose connections, or damaged components. Regular inspection and maintenance of the toilet’s inner workings can help prevent leakage and ensure optimal performance. If leakage persists, it’s advisable to seek professional assistance for repairs.
Worn Seal
Whether due to age or wear, a worn seal can cause leakage in the Dometic 310 toilet.Loose Bolts
Loose bolts between the bowl and base can lead to water seepage. The Dometic 310 toilet is a popular choice, but it may develop leakage issues over time. The following are the common reasons why leakage occurs with this toilet.Worn Seal
A worn seal can let water escape from between the bowl and base, leading to leaks.Loose Bolts
When bolts are loose, the connection between the bowl and base weakens, causing leakage.
Credit: livinginbeauty.net
Identifying The Issue
Visible Leakage
Look for water pooling around the bottom of the Dometic 310 toilet to detect any visible leaks.
Odor
Notice any unpleasant smells emanating from the area where the bowl and the base of the toilet meet.
Tools Required For Repair
When it comes to fixing a Dometic 310 toilet leaking between the bowl and base, having the right tools for the repair is essential. By ensuring you have the necessary tools on hand, you can efficiently address the issue and prevent further leakage problems.
Adjustable Wrench
An adjustable wrench is a versatile tool, crucial for loosening and tightening nuts and bolts. When repairing a Dometic 310 toilet, an adjustable wrench comes in handy for removing and reattaching the bolts that secure the toilet components.
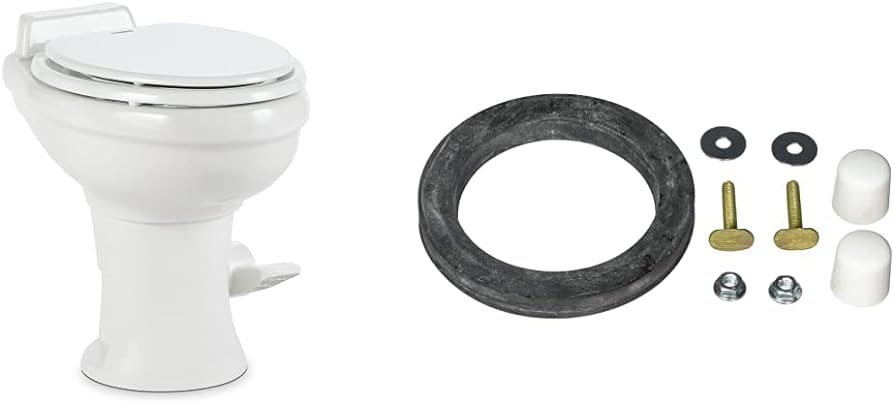
Replacement Seal
The replacement seal is a vital component when dealing with a leaking Dometic 310 toilet. It acts as a barrier to prevent water from seeping out between the bowl and the base. When replacing the seal, ensure it is compatible with the Dometic 310 model for a proper fit and effective seal.
Steps To Fixing The Leakage
Fixing the leakage between the Dometic 310 toilet bowl and base is a simple process that can be done in a few steps. By carefully examining the seals, tightening the bolts, and applying silicone sealant, you can ensure that your toilet remains leak-free.
Steps To Fixing The Leakage:
If you notice that your Dometic 310 Toilet is leaking between the bowl and the base, it is crucial to address the issue immediately to prevent further damage. In this section, we will guide you through the necessary steps to fix the leakage efficiently. By following these instructions, you can restore the functionality of your toilet and avoid any inconveniences caused by the leakage.
Step 1: Shut Off Water Supply
To begin the repair process, it is essential to shut off the water supply to the toilet. This will prevent any water from flowing into the tank or the bowl, minimizing the chances of further leakage during the repair. Look for the shut-off valve located near the base of the toilet, usually on the wall or the floor. Turn the valve clockwise until it is completely closed. This will stop the water flow and ensure you can work on the toilet without any complications.
Step 2: Remove Toilet
Once the water supply is turned off, you can proceed to remove the toilet to access the area where the leakage is occurring. Removing the toilet may seem like a daunting task, but by following these steps, you can do it effectively:
- Start by disconnecting the water supply line from the bottom of the toilet tank. Use an adjustable wrench to loosen the connecting nut and carefully detach the line.
- Next, locate the bolts securing the toilet to the floor. These bolts are usually covered with plastic caps. Remove the caps and use a wrench to unscrew the bolts, taking care not to damage the toilet or the floor in the process.
- Now, with the bolts removed, gently rock the toilet back and forth to break the seal between the toilet and the floor. Once the seal is broken, lift the toilet straight up to detach it from the flange.
- After removing the toilet, inspect the area between the bowl and the base for any visible signs of leakage. Look for cracks, worn-out gaskets, or loose connections that might be causing the problem.
By following these steps, you can successfully remove the toilet and identify the source of the leakage. In the next section, we will delve into the necessary repairs you can undertake to fix the issue and ensure your Dometic 310 Toilet is in proper working condition once again.
Replacing The Seal
Cleaning and maintaining your Dometic 310 Toilet is crucial to ensure its proper functioning. One common issue that many users encounter is a leaking toilet between the bowl and the base. If you notice water pooling around the base of your toilet, it is likely that the seal between the bowl and the base has worn out or become damaged. In this blog post, we will guide you through the process of replacing the seal, allowing you to fix the leak quickly and effectively.
Cleaning The Area
Before installing a new seal, it is essential to clean the area thoroughly. This ensures that the new seal adheres properly and prevents any debris or residue from affecting its performance. Follow these steps to clean the area:
- Turn off the water supply to the toilet to avoid any accidental leaks.
- Wipe down the entire toilet base, paying close attention to the area between the bowl and the base. Remove any dirt, grime, or old seal remnants using a mild detergent or cleaner suitable for toilets.
- Rinse the area with clean water to remove any residue from the cleaning solution.
- Use a dry cloth or towel to thoroughly dry the cleaned area. Ensure no moisture remains before proceeding to install the new seal.
Installing The New Seal
Once the area is clean and dry, you can proceed with installing the new seal. Follow these steps for a successful replacement:
- Obtain a replacement seal compatible with your Dometic 310 Toilet model.
- Position the new seal on the underside of the toilet bowl, aligning it with the corresponding grooves or ridges on the base.
- Press down firmly and evenly to ensure proper adhesion of the seal to the base.
- Check that the seal is evenly and securely attached around the entire circumference of the toilet base.
- Turn on the water supply to the toilet and flush it to check for any leaks. If you notice any water escaping between the bowl and the base, double-check the seal’s installation and readjust if necessary.
By following these steps, you can successfully replace the seal and eliminate the unwanted leaking between the bowl and the base of your Dometic 310 Toilet. Regularly inspecting and maintaining your toilet’s seals is essential to maintain its optimal functioning over time.
Reinstalling The Toilet
When reinstalling the Dometic 310 toilet to fix the leakage between the bowl and the base, the proper installation process is crucial to ensure a watertight seal and prevent any further leaks. In this section, we will guide you through the steps of reinstalling the toilet correctly to eliminate the problem.
Reattaching The Bolts
Before reinstalling the toilet, ensure the bolts are clean and undamaged. Position the toilet over the flange, aligning the bolts with the corresponding holes in the base. Gently lower the toilet, ensuring a secure fit over the flange.
Testing For Leakage
After reattaching the bolts, apply even pressure on the toilet to create a tight seal with the wax ring. Once reinstalled, pour a small amount of water around the base of the toilet and inspect for any signs of leakage. Additionally, flush the toilet to check for any abnormal water seepage between the bowl and the base.
Preventive Measures
Preventive Measures:
Ensuring the longevity of your Dometic 310 toilet requires proactive preventive measures. By implementing regular maintenance and practicing careful handling, you can prevent the common issue of leaking between the bowl and base.
Regular Maintenance:
Perform monthly inspections to check for any signs of wear or damage. Clean the toilet using gentle, non-abrasive cleaners regularly. Tighten any loose bolts or connections to prevent leaks.
Careful Handling:
When cleaning the toilet, avoid using harsh chemicals that can damage the seals. Do not over-tighten the bolts when reassembling the toilet as this can cause stress on the seals. Handle the parts with care to prevent any accidental damage.

Credit: www.ubuy.co.in
Seeking Professional Help
To address a Dometic 310 Toilet leaking between the bowl and base, understanding When to Call a Plumber is crucial. Additionally, weighing the merits of DIY vs Professional Assistance can lead to a timely resolution.
When To Call A Plumber
Consider calling a plumber if the Dometic 310 Toilet leak persists despite DIY attempts. Plumbers can efficiently diagnose and resolve complex toilet issues.
Diy Vs Professional Assistance
While DIY fixes are cost-effective, professional assistance ensures a thorough inspection and lasting solution. Professional plumbers possess the expertise to address challenging toilet leaks effectively.

Credit: www.amazon.com
Frequently Asked Questions On Dometic 310 Toilet Leaking Between Bowl And Base
How Do I Fix A Leaking Dometic 310 Toilet?
To fix a leaking Dometic 310 Toilet, start by checking the water connections and tightening any loose fittings. If the leak persists, you may need to replace the seal between the bowl and the base. This can be done by removing the toilet, cleaning the area, and installing a new seal.
What Causes A Dometic 310 Toilet To Leak?
A Dometic 310 Toilet may leak due to a variety of reasons. Common causes include a faulty seal between the bowl and the base, loose water connections, or a cracked toilet bowl. Identifying the specific cause of the leak is essential for effective troubleshooting and repair.
How Can I Prevent Leaks In My Dometic 310 Toilet?
To prevent leaks in your Dometic 310 Toilet, regularly inspect the toilet for any signs of wear or damage. Be sure to tighten water connections and address any leaks promptly. Additionally, avoid using harsh chemicals or abrasive cleaning tools that could cause damage to the toilet’s components.
Conclusion
Dealing with a Dometic 310 toilet leaking between the bowl and base can be frustrating. However, with the right tools and techniques, you can easily fix this issue. By following the step-by-step guide provided in this blog post, you can effectively troubleshoot and resolve the problem, ensuring your toilet functions properly.
Don’t let a leaking toilet disrupt your daily routine – take action and solve the issue today.