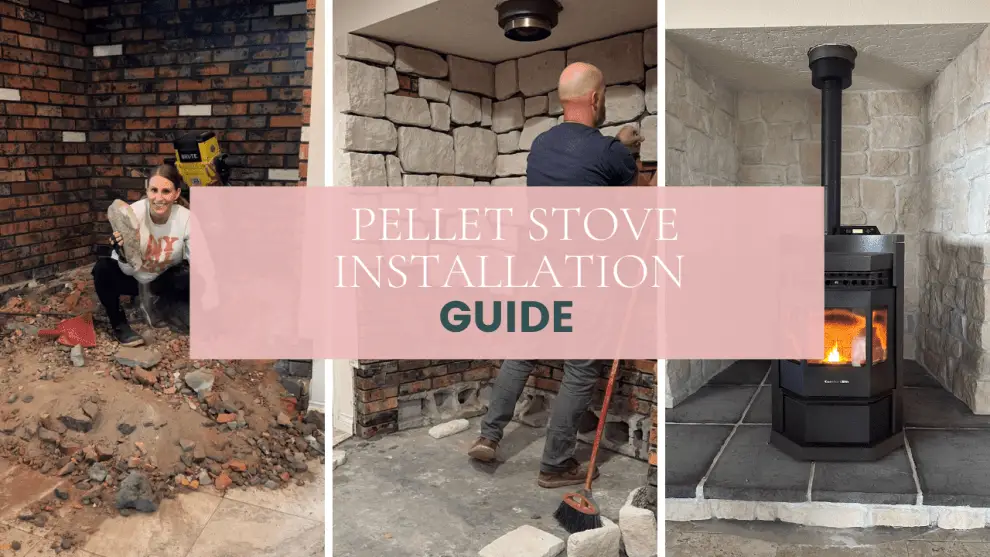
To install a pellet stove in an existing fireplace, you may need a chimney liner for proper venting. Pellet stoves can be installed in existing fireplaces for efficient home heating.
Pellet stoves are innovative appliances fueled by wood pellets that produce and distribute heat effectively through the house. Whether you choose a freestanding stove or an insert, understanding the installation process is crucial for safe and effective heating. In this guide, we will explore the key steps and considerations to install a pellet stove in an existing fireplace seamlessly.
Learning about the venting requirements, chimney liners, and safety precautions will help you successfully set up your pellet stove for cozy warmth in your home.
Credit: myfire.place
Choosing The Right Pellet Stove
When installing a pellet stove in an existing fireplace, selecting the right stove is crucial for optimal performance. Here are key factors to consider:
Consider The Size Of Your Fireplace
- Determine the dimensions of your fireplace opening
- Ensure the pellet stove you choose fits snugly and allows for proper ventilation
Assess Your Heating Needs
- Evaluate the square footage of the space you aim to heat
- Consider the insulation levels and layout of the room
Choosing a pellet stove that aligns with your fireplace size and heating requirements will ensure efficient and effective heating for your home.
“` By carefully considering your fireplace dimensions and heating needs, you can make an informed decision when selecting a pellet stove for installation. Prioritize a proper fit and heating capacity to enjoy warmth and comfort.
Credit: www.wikihow.com
Preparation And Planning
When it comes to installing a pellet stove in an existing fireplace, proper preparation and planning are key to a successful project. Here’s how to get started:
Measuring The Fireplace And Clearances
Before beginning the installation process, measure the dimensions of your fireplace and ensure there are adequate clearances for the pellet stove according to the manufacturer’s specifications. Clearances are crucial for safety and efficiency.
Checking Local Building Codes And Regulations
Ensure to check local building codes and regulations to confirm that the installation of a pellet stove in an existing fireplace is compliant. Adhering to regulations is essential for a safe and legal installation.
Installing The Pellet Stove
To install a pellet stove in an existing fireplace, begin by carefully reading the manufacturer’s instructions. Ensure the chimney is clean and clear, ready for the venting system. Then, place the stove into position and connect it to the venting system, ensuring proper sealing and insulation for efficient operation.
Clearing The Fireplace
To begin the installation process, the first step is to clear the fireplace of any debris, ash, and soot. Ensure that the flue is free from obstructions and clean the surrounding area to provide a clear workspace.
Positioning The Stove And Venting
Next, carefully position the pellet stove to ensure it aligns with the fireplace opening. It’s essential to follow the manufacturer’s guidelines for proper placement. Once positioned, consider the venting requirements. This includes determining the optimal route for the vent pipe to ensure safe and efficient operation.
Chimney And Venting Considerations
Considerations for chimney and venting play a crucial role in installing a pellet stove in an existing fireplace. Proper venting through the chimney requires a chimney liner to ensure safe operation and efficiency. Consulting a professional for chimney and venting assessment is recommended for a successful installation.
Understanding The Need For A Chimney Liner
When it comes to installing a pellet stove in an existing fireplace, chimney and venting considerations are crucial. One important aspect to understand is the need for a chimney liner.
A chimney liner is a protective barrier that lines the inside of your chimney. It serves multiple purposes, including:
- Improving draft efficiency
- Reducing the risk of gas leaks
- Preventing the formation of creosote
Without a chimney liner, the heat and gases produced by the pellet stove can seep into the surrounding masonry, potentially causing damage and creating a safety hazard. Therefore, it is recommended to install a chimney liner to ensure proper venting and maximize the performance of your pellet stove.
Properly Venting The Pellet Stove
Now that you understand the importance of a chimney liner, let’s dive into the process of properly venting the pellet stove.
There are a few options when it comes to venting a pellet stove:
- Through an existing masonry chimney: Pellet stoves can be vented through an existing masonry chimney. However, it is essential to install a chimney liner to create a sealed and insulated venting system. This will provide optimal performance and safety.
- Through a dedicated pellet stove vent pipe: If your existing fireplace doesn’t have a masonry chimney or you prefer an alternative option, you can opt for a dedicated pellet stove vent pipe. This pipe is specifically designed for pellet stoves and ensures proper venting.
Whichever option you choose, it’s crucial to follow the manufacturer’s instructions and local building codes for proper installation. This may involve hiring a professional to assess your chimney and venting system and make necessary modifications.
Remember, proper venting is vital for the efficient operation of your pellet stove and the safety of your home. Don’t overlook this crucial step in the installation process.
Final Steps And Considerations
As you near completion of installing a pellet stove in your existing fireplace, remember to check for proper ventilation and chimney lining. Consider additional safety measures for optimal efficiency. Complete the setup with a final inspection to enjoy a cozy and eco-friendly heating solution.
Connecting And Testing The Pellet Stove
Once you have successfully installed the pellet stove in your existing fireplace, it’s time to connect and test it. Follow these steps:
- Attach the venting system to the stove and secure it properly. Ensure that the vent pipes are properly aligned and connected tightly.
- Connect the power supply to the stove. Make sure you follow the manufacturer’s instructions for proper wiring and electrical connections.
- Turn on the pellet stove and set it to your desired temperature. Allow the stove to run for a few minutes to ensure it is functioning properly.
- Check for any leaks or unusual sounds during operation. If you notice any issues, turn off the stove immediately and contact a professional for assistance.
By following these steps, you can ensure that your pellet stove is connected properly and ready for use.
Monitoring And Maintenance Tips
Now that your pellet stove is installed and tested, it is important to understand how to properly maintain and monitor its performance. Here are some tips:
- Clean the pellet stove regularly to remove any ash or debris that may accumulate. This will help maintain its efficiency and prevent potential issues.
- Check the pellet hopper regularly to ensure an adequate supply of pellets. Refill the hopper as needed to avoid running out of fuel.
- Monitor the temperature and adjust the settings accordingly to maintain a comfortable and efficient heating level.
- Inspect the venting system periodically to ensure there are no blockages and that it is functioning properly. A blocked vent can lead to poor performance and potential safety hazards.
By following these monitoring and maintenance tips, you can extend the lifespan of your pellet stove and ensure it operates at its best.

Credit: howwedo.net
Frequently Asked Questions Of How To Install A Pellet Stove In An Existing Fireplace
Can I Vent A Pellet Stove Into An Existing Chimney?
Yes, pellet stoves can vent through an existing masonry chimney with a chimney liner. This method is explained in an article by Hunker titled “How to Install a Pellet Stove Through the Chimney. “
Can A Pellet Stove Be Installed In A Fireplace?
Yes, a pellet stove can be installed in a fireplace. Both pellet stove inserts and fireplace inserts can be installed inside existing fireplaces, providing numerous benefits. Pellet stoves are fueled by wood pellets and generate intense heat that is blown into the home with fans.
A chimney liner may be required for proper venting.
Do I Need A Chimney Liner For A Pellet Stove?
Yes, you need a chimney liner for a pellet stove. It is necessary to funnel exhaust fumes out of your home through the existing ventilation structure.
How Much Does It Cost To Convert Fireplace To Pellet Stove?
Converting a fireplace to a pellet stove costs around $2,000-$5,000, including installation. Factors like chimney modifications or additional repairs may affect the price.
Can I Install A Pellet Stove In My Existing Fireplace?
Yes, both a pellet stove insert and a fireplace insert can be installed inside your existing fireplace, providing numerous benefits. Pellet stoves generate intense heat blown into the home with fans.
Conclusion
Installing a pellet stove in an existing fireplace is a feasible and efficient way to add warmth to your home. With proper preparation, including chimney liners if needed, and following the manufacturer’s installation instructions, you can enjoy the benefits of a pellet stove.
Make the most of your heating options with a professionally installed pellet stove.